Showing posts with label Blogging Tips. Show all posts

Sunday, 14 February 2010

Add Google Buzz Buttons To Blogger Blog

Buzz It

google-buzz-buttons-for-blogger Google Buzz is a social tool from blogger and it is much similar to twitter and facebook :). Google Buzz is a new way to start conversations about the things you find interesting. You can read more about Google Buzz at the official Google Blog . You might have seen the Google Buzz buttons on Mashable. This one is similar but doesn’t produce any share count.

You can see a demo of this button in this post page. :) .

To get the Buzz button on your blog, posts follow these steps.

1. Login to your Blogger Account and navigate to Layout > Edit HTML and Expand your widget templates.

2. This is the Google Buzz it Code. Copy it. If you want to use some other Google buzz button image , then you can do that by changing the image link in the code [http://i48.tinypic.com/idyc04.png]

<div style="float:right;padding:4px;">
<a expr:href='&quot;http://www.google.com/reader/link?url=&quot; + data:post.url + &quot;&amp;title=&quot; + data:post.title + &quot;&amp;srcTitle=&quot; + data:blog.title+ &quot;&amp;srcURL=&quot; + data:blog.homepageUrl ' rel='nofolloW' style='text-decoration:none;' target='_blank'>
<img alt='Buzz It' src='http://i48.tinypic.com/idyc04.png' style='border:0px;'/></a>
</div>


3.Now find this piece of code in your template


<div class='post-header-line-1'/>

and immediately after that place our Google Buzz it  Code and you are done :)

If you were unable to find this code in your template,then look for the first occurrence of


<data:post.body/>


and immediately before that, place our Google Buzz it Code.


4.Save your template and see the results.

read more...

Saturday, 13 February 2010

How to Fix Newer Older Post Navigation?

Yesterday, Im shocked by hidden older and newer post navigation. Actually I dont know why it's happened because my template (also on this blog) display properly since I create it.

Why my newer and older post navigation is hidden or display unproperly? How to solve this? I have tried to edit CSS code. Fortunately, it works.

Follow this step.
1. Open edit HTML
2. Check this section code
#blog-pager {
text-align: center;
}

3. Insert clear:both; code so the code will be look like this
#blog-pager {
text-align: center;
clear:both;
}

4. Save

Hope this work on your template too.
read more...

Wednesday, 10 February 2010

Add Signature to Blogger Blog

You might want to add a custom automatic signature below each of your blog posts. This would be more useful if you are running a Team Blog with multiple authors. You can use unique signatures for each author.The same can be done on a single author blog also :)

Adding Signature to Single Author / Multi Author Blogger Blogs

1. Create a Signature using Photoshop or some online Generators like My Live Signature

2. Upload this signature image to blogger.Once its uploaded hit preview and copy the image location(Note down the URL of the image).

3.Now Go to Layout > Edit HTML and Expand your Widget Templates

4.Now Find

<div class='post-footer-line post-footer-line-1'>


If you cant find it then try finding this one


<p class='post-footer-line post-footer-line-1'>


or this one


<data:post.body/>


a) If you are using a Single author blog, paste the following code below the code you found


<img src='url_of_your_signature_image' style='border:0px;'/>


Code should be edited with your signature image URL


b) If you are on a Team Blog, paste the following code just below the code you found


<b:if cond='data:post.author == &quot;Author1Name&quot;'>


<img src='url_of_author1_signature_image' style='border:0px;'/>


</b:if>


<b:if cond='data:post.author == &quot;Author2Name&quot;'>


<img src='url_of_author1_signature_image' style='border:0px;'/>


</b:if>


If you have more number of authors, you can repeat the blocks accordingly(here i have mentioned 2 blocks[blue and brown] one for each of the two authors).Codes should be edited with the author names and the signature image  urls.


5.Save your template and you should see the signature in action :)


signature

read more...

Friday, 22 January 2010

Blogger FTP to Custom Domain Migration

Blogger has officially announced that it would be shutting down the FTP publishing feature on March 26 2010. So the existing FTP publishers are advised to move onto Blogger Custom Domains.If you are not currently using the FTP publishing option, you can just skip this tutorial :)

Blogger has already posted about the advantages of custom domains.

Where do you currently publish your FTP blogger blog ?

1.If you are publishing at a root level domain or sub-domain, then the things are pretty easy. (eg. www.yourblog.com or blog.yourdomain.com).

2.If you are publishing your blog at some subfolder within your domain or subdomain(www.yourdomain.com/blog), then you can no longer host your blog at that address, because Custom Domains can be setup at root domain or sub-domains only.Blogger will soon release a migration tool which will help you in properly redirecting such blogs.

Can i get rid of my web-host?

If you are hosting your blog at a root level domain or sub-domain and not inside a directory and if you are have not published any images via FTP(images are hosted on other sites like flickr), then you no longer need a web-host.

Migrating www.yourblog.com (FTP) to www.yourblog.com  (Custom Domain)

Note:- The following steps can also be used to migrate a sub-domain from FTP to Custom domain(ie blog.yourdomain.com from FTP to Custom Domain).  This method cant be used for migration of a blog located at www.yourdomain.com/blog or subdomain.yourdomain.com/blog

1. When you move your blog to a custom domain, you will have to  move all the images to a different sub-domain on your server

2.Create a new sub-domain like files.yourblog.com and move all your images to this sub-domain (For example www.yourblog.com/uploaded_images/image1.jpg should now be accessible at files.yourblog.com/uploaded_images/image2.jpg)

3.If you are using a shared hosting service, ask your host to create a Canonical Name(CNAME) record for www with value ghs.google.com

(DNS changes are cached  at many levels and your ISPs may take time to get in sync with the 13  root level domain name servers. So the changes may take time :)

4.Once your host is done with it, Log in at your Blogger Dashboard and navigate to Settings > Publishing

5.Opt For Switch to:  Custom Domain (Point your own registered domain name to your blog)    and switch to advanced settings

6.Type your new domain/subdomain there image and in the missing file host option type in files

image

type the captcha and save the settings. If everything goes right, your blog has now been successfully moved to the custom domain.

What does the Missing files host do?

When blogger is not able to find a file like www.bloggerplugins.org/uploaded_images/image1.jpg , it will try to find it at files.bloggerplugins.org/uploaded_images/image1.jpg [Click on the link to see it in action]

If you are hosting your blogger blog on a sub-directory, then wait for the Blogger FTP migration tool(it will be out in a couple of weeks). Once you are done with the migration tool, just follow the steps 4-6.You wouldn't need to use a missing files host in that case.


If you have any questions about the migration, leave your questions in the comments section.

read more...

Wednesday, 11 November 2009

Create a cool 3D text using Photoshop and Illustrator

Create a cool 3D text using Photoshop and Illustrator


  • Name : 3D text using Photoshop and Illustrator


  • Teacher : Ourtuts


  • View Full Tutorial


  • Category : Tutorials


This tutorial will show you how to create a cool 3D text or typography using Adobe Photoshop and Illustrator. Photoshop is not enough to create a 3D symbol,but Adobe has another application in which you`re able to do this very easily.It is Adobe Illustrator. So, to follow this tutorial,you must have Adobe Photoshop and Illustrator.
read more...

Saturday, 31 October 2009

New Transparent Blogger Navbar Style

What's Blogger Navbar? Blogger Navbar is default navigation menu bar on top page. Older Blogger Navbar color only have four traditional color scheme choices — Blue, Black, Tan, and Silver — are somewhat limited, especially if our blog's background color. That's why I hide navbar because doesn't match with my blog color.

But now, Blogger have improved this area. Blogger have added two new color schemes — "Transparent Light" and "Transparent Dark." These new color schemes take advantage of the ability of modern browsers to render transparency (a technique known to web designers as "alpha blending"). This allows the navbar background to blend together with your blog's background color and pattern. That's mean you can get this transparent navbar if you use modern browser, except Internet Explorer 6. This browser doesn't support transparent image.Why dont think to upgrade it? :D


To enable the Transparent Light or the Transparent Dark navbar, go to Layout | Page Elements, then click Edit next to the navbar widget


But, blogger navbar is hidden on my template. How to show that? Read this article How to Show Blogger Navbar.
read more...

Wednesday, 28 October 2009

Facebook Share Count Buttons For Blogger

Facebook has now officially introduced the Retweet like buttons for your blogs or sites. These buttons look much similar to the Retweet buttons by Tweetmeme. Facebook has 5 styles of Sharing buttons. Here we will see two of them.

Adding a Facebook share count button will show a neat count of how many times your blog post has been shared on Facebook.

Facebook Share Button Style 1

facebook-share-button-for-blogger-1

Code for Facebook Share Button Style 1

<div style="float:right;padding:4px;">
<a expr:share_url='data:post.url' name='fb_share' rel='nofollow' type='box_count'/>
<script type="text/javascript" src="http://static.ak.fbcdn.net/connect.php/js/FB.Share"/>
</div>


Facebook Share Button Style 2


facebook-share-button-for-blogger-2


Code for Facebook Share Button Style 2


<div style="float:left;padding:4px;">
<a expr:share_url='data:post.url' name='fb_share' rel='nofollow' type='box_count'/>
<script type="text/javascript" src="http://static.ak.fbcdn.net/connect.php/js/FB.Share"/>
</div>


Facebook Share Button Compact Style 1


facebook-share-button-for-blogger-3


Code for Facebook Share Compact Button Style 1


<div style="float:right;padding:4px;">
<a expr:share_url='data:post.url' name='fb_share' rel='nofollow' type='button_count'/>
<script type="text/javascript" src="http://static.ak.fbcdn.net/connect.php/js/FB.Share"/>
</div>


Facebook Share Button Compact Style 2


facebook-share-button-for-blogger-4


Code for Facebook Share Compact Button Style 2


<div style="float:left;padding:4px;">
<a expr:share_url='data:post.url' name='fb_share' rel='nofollow' type='button_count'/>
<script type="text/javascript" src="http://static.ak.fbcdn.net/connect.php/js/FB.Share"/>
</div>


How to install Facebook Share Count Button on your Blogger Blog?


1.Select one of the Share Button Styles and copy the Corresponding Code.


2.Now login to your Blogger Dashboard and navigate to Layout > Edit Html and expand the widget templates


3.Find this piece of code


<div class='post-header-line-1'/>

and immediately after that place our Facebook share button code(that you copied)

If you were unable to find this code in your template,then look for the first occurance of


<data:post.body/>


and immediately before that paste our Facebook Share button code(that you copied).


5.Save the template and you should get a facebook share count button near each of your blog posts.


If you liked this post and if it helped you in implementing the facebook buttons, then please consider sharing this post on Facebook using the button on the top-right of the post :)


Link: Additional Share Button Styles on the Facebook Developers Wiki


Permalink :Facebook Share Count Buttons for Blogger

read more...

Tuesday, 27 October 2009

Create a Facebook Fan Page for your Blog

facebook-fan-page-for-blogger-blogs


Facebook is a great Social Networking Site to promote your blog or brand. Most of the major brands do have a Facebook Fan Page. Here are some examples of Facebook Fan pages – Coca Cola FB Fan Page , Mashable FB Fan Page. Are you impressed and wanna create one for your blog? I too wanted to create one and i finally made it. Here is the link of my Facebook Fan Page . So lets start making our own Facebook Fan Page for our blog.


1.Go to the Create Fan Page Link on Fabebook


facebook-fan-page-for-blogger


Select Brand, Product, or Organization > Website . Type the Name of your Fan Page and agree to make it public. Now just hit the Create Button and your Fan page would be created :)


2.On the Next Page, select the options Change picture and Edit Information and you what is to be done there :)


facebook-fan-page-for-blogger-2


3.Now the most important thing that you might want is to automatically import your blog posts to the Fan Page .From the Tabs, Click on the + and Opt for Notes.


add-notes-to-facebook-fan-page


On the next screen Opt to Write a New Note


write-notes-on-face-book-page


4.You will see an Editor and some icons at the Top . Click on the Notes Icon at the top.


import-notes-to-facebook-page


5.On the Next Page, opt for Import a blog


import-blog-to-facebook


6.On the next screen, type in your blog URL, and agree to the agreement and Click Start Importing


import-blog-posts-to-facebook


If this gives some error try using the url http://yourblog.blogspot.com/feeds/posts/default


7.On the Next page, Confirm the Blog import


confirm-facebook-blog-import


8.After confirming, all your blog posts will be imported to the fan page. Now click on your Fan Page Link and get back to the fan page..


click-on-face-book-fan-page-link


9.promote-with-fan-box Now we have successfully created the Fan Page.If you want to remove some of the unwanted tabs like Discussions, Photos, Boxes etc, then you can go to that Tab and remove it.


Now you can add a Fan box to your blog so that your blog readers can join you on Facebook. To do this, goto the Page Badges Link .Select Fanbox from the Left menu


Now Select your page and the Options that you want and then opt to to add the fan box to blogger using the Blogger Button


add-fan-box-to-blogger


Now you should have the Fan box added on to your blog :)


Your Fan Page URL will look something like http://www.facebook.com/pages/Blogger-Widgets/252379165362 .Now if you have a pretty good number of fans(i think the minimum requirement is 25 fans) , then you can have a pretty facebook URL like http://www.facebook.com/bloggerplugins instead of a long one like http://www.facebook.com/pages/Blogger-Widgets/252379165362 .


To claim such small usernames for your facebook page, go to http://www.facebook.com/username/ and Click on Set a username for your Pages. There you can select the small pretty user name for your fan page.Once you opt for a user name you can’t change it back again. So be careful when choosing your Facebook Fan Page Username.


10. This is the most important Step of all ;)


Be my fan on Facebook ;)  and you will get all my blog updates on my Facebook Fan Page.

Permalink: Create a Facebook Fan Page for your Blog

read more...

Tuesday, 20 October 2009

Setting up Blogger Custom Domain on Name.Com

If you are not sure what a custom domain is, then first read this article about Blogger Custom Domains and come back .

How to buy the Domain Name?

Name.Com will allow you to buy domains with different extensions like .COM, .NET, .ORG etc .

1. First of all Goto Name.Com and you will find a Search Box there. This search box can be used to check if the domain name is available or not. For example if i need the domain mynewcustomdomain.com , then i will search for mynewcustomdomain

name-custom-domain-1

2.Name will show the available domain name extensions.Select the one you want.

blogger-custom-domain-name.com

3.Click the Checkout Button and on the next screen opt to create an account(if you don’t have one. if you have one , then login with that account)

custom-domain-part-3

4.Now finish the payment process(using credit card or paypal) and you will be having the domain under your name.com account

How to Setup the Blogger Custom Domain?

1.If you are logged in at your name.com account, then click  the Account Icon V

name.com-customdomain-setup-for-blogger


2. Now you will be taken to a page listing all your domains. Click on the domain name which you want to use for your blogger blog.

custom-domain-on-blogger

3. On the next screen Click DNS Management form the Right Sidebarname1
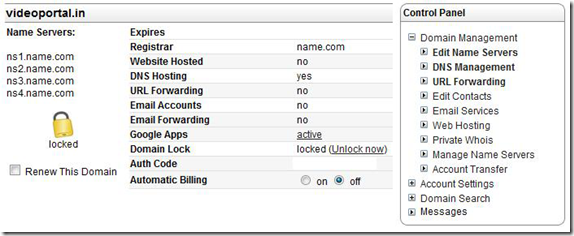
4.In the DNS Management, add a new CNAME record with the following values CNAME, www, ghs.google.com,1800 and submit

name2

5.Now again add another DNS record with the following values A, (leave next field blank),216.239.32.21 and 1800 and click submit

name3

6. Now we are done setting up the CNAMES

Adding the Custom domain at Blogger.com

1.Login to your Blogger Dashboard and Navigate to Settings > Publishing.

2.Opt For Switch to:  Custom Domain (Point your own registered domain name to your blog)    and switch to advanced settings

3.Type your new domain there ,fill in the Captcha and save the settings.name6

4.Now select the redirection Option and save the settings Once again

5. Now your blog should be visible at your new domain. The changes can take up to 3 days to take effect (This is because your ISP’s DNS Server has to get the new updated information about the domain records.)

Setting Up Google APPs

1.Login to you Name.Com account once again

2.Click the Account Icon and then Click the domain name that we just used.

3.Now Click on the Enable link next to Google APPS

name1

4. On the next Screen fill out the required details and click Continue with setup

name4

5.Now you will be able to access your version of Gmail at http://mail.yourcustomdomain.com and similarly you will have the other Google apps running on your sub domains.


Try it out guys. and let me know if this tutorial  helped you in any way :)


Permalink: Setting up Blogger Custom Domain on Name.Com

read more...

Tuesday, 29 September 2009

Blogger Showcase , Submit Your Blog

There are so many showcase gallery but mostly for Wordpress platform.I have ever listed about Web Design Showcase gallery, for design inspiration. No need to worry for Blogger platform user, now you can submit your site to Blogger Showcase, showcasing best blog design using Blogger platform.


Is there any complicated condition? These are simple requirements
  1. Blogger platform is a must
  2. Your blog can be original blogspot domain or custom domain
  3. For personal blog, must be unique blog design
  4. For niche blog, must be useful and original content
By submitting your blog, you get more chance for promoting your blog. What are you waiting for, just submit your blog or suggest your favourite blog.
read more...

Friday, 18 September 2009

Shiny Calligraphy Text Effect in Photoshop

Shiny Calligraphy Text Effect in Photoshop


  • Name : Shiny Calligraphy Text Effect


  • Teacher : Abduzeedo


  • View Full Tutorial


  • Category : Tutorials


Guide to create a nice sort of 3D effect using a calligraphy font and a lot of Layer Styles in Photoshop. The effect is really simple and we will take a look at how to create patterns and light effects with Blend Modes.
read more...

Thursday, 17 September 2009

How To Draw Manga Hair, Four Different Ways

How To Draw Manga Hair, Four Different Ways


Manga creator Mark Crilley presents a tutorial on drawing four different manga hairstyles, two of them shown in real time.
read more...

Amazing Video-Game Text Style in Photoshop

Girls Fantasy Land Blogger Template


King of retro effects Fabio Sasso shares a sweet technique for creating some fantastic video-game inspired type in Photoshop. You can also grab it as a wallpaper if you feel so inclined.
read more...

Wednesday, 9 September 2009

Blogger Readmore Feature

Yesterday, Blogger has announced another Blogger Birthday feature. Blogger has add readmore feature on your post. Now you dont need to add any code because this new readmore feature ease us to choose whether show full post or break post.

Blogger call this feature  Jump Break. With Jump Breaks you can show just a snippet of your post on your blog's index page. Blogger will insert a "Read more" link to the full post page where your readers can keep reading.


How to use this blogger readmore feature?
There are two ways to insert a "Read more" jump to your posts.

If you use the new post editor , you'll notice the "Insert jump break" icon in the editor's toolbar. Click this icon and the "jump break" will be inserted into your blog post at your cursor's position.


If you don't use the new post editor, you can still insert a jump break in Edit HTML mode by adding <!-- more -->  where you want to break your post.

Want to change the "Read more" text to your own style? No problem. You can edit the "Read more" text by clicking Layout and then Edit the Blog Posts widget.


What if I use template with automatic readmore feature? Will discuss on the next post.

Source : Blogger Buzz
read more...

Blogger New Post Editor

Actually New Post Editor have been announced at June 2008 access through Blogger Draft. And now this feature have been launched officially on Blogger. This is one of many features announced as part of Blogger's 10th birthday. Blogger has developed new post editor embedded with multi features. You can set this new post editor, access through Setting - Basic , find the lowest section, at Select Post Editor, then choose Updated editor.

Improved Image Handling and HTML

At Old Editor, when you upload image you'll get new pop up window with maximum 5 image in every uploading. This is really wasting time. But now with the new post editor it will appear as a thumbnail in the image dialog box. That way, you can upload several images at once, and then add them into your post at your convenience. The thumbnails will be available until you close the post editor.
If you use Edit HTML, especially to add tables and other advanced HTML to your posts, you should find that the new editor has a number of enhancements to make the experience less frustrating, or, dare we say it, even pleasant.

Other Features
  • Easy link editing in Compose mode. Just click a link and you’ll have the option of changing its URL or removing the link.
  • Full Safari 3 support on both Windows and Macintosh. The old editor is pretty quirky on these browsers, but the new editor works as you’d expect.
  • New Preview dialog that shows your post in a width and font size approximating what you’d see on a blog.
  • Placeholder image for tags (such as those from video embeds) so that you can see and drag them around Compose mode.
Source : Blogger in Draft
read more...

Saturday, 22 August 2009

List of Blogs with Unique Design Under Blogger/Blogspot Platform

Blogger/blogspot become more popular in new bloggers as their first blogging platform. As a user I said that this platform easy to customize. We often meet unique design in Wordpress platform, with flexibility in plugin, they can create unique design with special effect.

But it's all about creativity. I found some unique design too under blogger platform. Here they are

Blog Amuki : an artistic design with flash slideshow featured.


Cebong Ipiet's Personal Blog : this is my personal blog haha im being narcist


Deconstruction Code : dark design full javascript effect make this design so manly


Chic and Sassy : girly design with swirl pattern. You can find another girly template here


Extra Icing Cake : one of Gisele Jaquenod's portfolio, with cute cake header


Green Corner Cookies : combination of pink and green for cookies blog


Itzi Blog : another Gisele's design


Jasmin Love Coffee
: another Gisele's design


Mike Matas : Personal photoblog, designed grunge and simple


Savvy Moxie
: dark red color for mom blog


Sprinkle : another Gisele's design


Cheth Studio : dark design with unique features


Sweet Cupcakery : detailed with sweet cupcake


Quinto Elemento


Flair in The City
: such a fashionable and cute template

read more...