Hi friends today i am going to make you learn a hack for blogger which you can use for fun in your blog.I am sure some will love it for sure but use it for fun only in your blog.Its funny hack for blogger comments count, as with it you can increase your comment count for all blogger posts with any fixed count you want.Got confused :) no need to worry, i will explain you.Suppose your blog post have have 0 comments, i will make it possible to readers to show 1000 comments or any number you want, so cant wait to implement it.I think i should proceed to the tutorial so that all of you can enjoy this funny hack in your blogger.
You can also check the demo for this hack here as you will see the comments count to be 9760 here for all posts or more.
1. Sign in into your blogger account and go to Design > Edit HTML
2. Look out for tag
3. Add the following code before it
a.comment-link:before{content:"76";}
4. Now save the template and view your blog
Hurray now your post having 0 comments will show up 760 comments.Its really fun.
You can change 76 to any number you want.Try using it and have fun.
Hi friends you would have seen a reply button to each particular comment in wordpress blogs, and we also want blogger to add this feature in blogger comments and make blogger comments more useful.But they busy in adding more blogger features to blogger blogs to make it more easy and useful.As its not possible to make hack to have this reply button in blogger comments as wordpress blogs, but we have come with small hack like this to make reply button which would make look blogger comment system look better than before.
You must need to change the YOUR-BLOG-ID with your blog id.Now how to get your blog id.Just got to blogger Design > Page Elements. Now see for adress bar in your browser.You will get link like this.
Just get the id number in pink border and replace in the above code.And you have done now and just save your template.Now you will be able to see the reply button in each blogger comments.
Now Some customization to reply button.
Some users will like to want to keep reply button instead of text [reply].So just replace [Reply] in red in above codes with below image link and you will get reply image instead of that text.
Just to have your own image change the image link with yours to have your own image.
Advantages
As now your readers just need to hit the reply button to any particular comment and a pop window will open like below and just need to write comment there and publish it.As it will make comments publish fast and easily.
Just type your comment after the text written in window above and publish it.
Comparison To Wordpress
As in Wordpress when doing comments using reply button, the comment get publish after the comment u replied to but in this hack the comment get publish as usual in last as blogger does, not like wordpress :)
But still i feel many will like this for sure to make look here blogger comment system look good and making easy for readers o reply.
If you have any further questions leave your comment below i will try to solve your issues. Source:- Thisischen
How make work automatic read more hack with thumbnail from blogger static pages,as we have been using automatic read more hack with thumbnail in blogger templates alot.But after the the blogger released static pages feature for the bloggers, the read more hack started making problems in static pages.As when we open the static page in blogger,it openes with read more hack and remains same on expanding.So to make the pages feature work well with this hack we have to remove the automatic read more hack with thumbnail from pages to make the blogger pages work well.
So just now get continue with the implementation of hack to remove read more hack from blogger static pages.
Just Login To Blogger and Go To (Dashboard → Layout → Edit Html → Expand Widgets → Press Ctrl+F) and now search for below codes.
What you have to do is find the code like above in your template, and add the red codes to them like i did to make static pages feature work properly with this hack.I have implemented this hack on my automatic read more hack with thumbnail.
I hope now you will be able to make pages feature work properly with this hack in your blog.If you have any other problems or using any other read more hack and facing problem let us know below in comments and dont' forget to check our last hack on how to use custom fonts for blogger.
Hi friends as this is my first tutorial on my blog from a long time, as i have been giving you a lot of templates for your blog from past few months.And thanx to you all for appreciating and using my templates.But From now i would be making tutorials for you as well with templates.So tutorial for you today is about adding the custom fonts to your blogger blog, for its post titles or for post body.As before also it was possible to add custom fonts to blogger using cufon, but it was bit complicated and difficult to do so in blogger and it also increased the loading time for our blog.
So now its very easy to add custom fonts to your blogger blog and it doesn't effect the loading time of your blog too.I will tell you two API to add custom fonts.Use the one where you like the font style to be used in your blog.
1.Google API (Best method to add fonts but as now font styles are very limited here will be more added soon by google.)
2.Kernest API (Its also an good API but with good collection of fonts.You also can use it for sure.)
Installation Steps For Custom Fonts From Google API
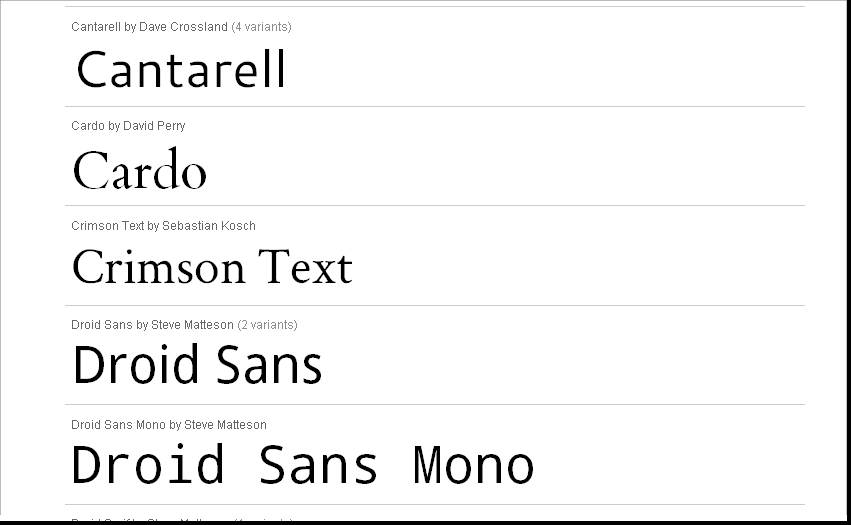
1. Go To Google API.You will see Fonts Written Like Below.
2.Just Hover your mouse over the font you like and you will see link click to embed font name.Just click the link or font only you liked.
3.Now you will be shown the get the code button and the the demo of how your font looks in different sizes.
4.Now just click the get the code button and you will be given the code like below.
5.Just copy the code from there. Codes are like below.
6.Now Just go to blogger Layout > Edit Html > Press CTRL+F and find for tag.
7.Now Just place the codes you just copied from google api before this tag.And now you are done to place the font codes succesfully.
Now comes the part to define font in your css to which titles or post body you want to show that font.As to define font you need to know some css codes about your templates, to know which css property defining your particular font style.
Like you want to define this font for your header title, now you need to know in which css part of your template, the font -family for your header has been defined.As now most bloggers are using custom templates, so css for each of you is different.Its difficult for me to tell for each, which css you use for header title and which for sidebar titles.So i will just tell you the basic css style you need to add in your template considering the default codes the blogger template use.
#header h1 {font-family:FontName;} */ This css style for Header Title /*
.description {font-family:FontName;} */ This css style for Header description /*
.sidebar h2 {font-family:FontName;} */ This css style for Sidebar Title /*
.post h3 {font-family:FontName;} */ This css style for post Title /*
.post {font-family:FontName;} */ This css style for post body /*
#footer h2 {font-family:FontName;} */ This css style for footer Title /*
body {font-family:FontName;} */ This css style for whole template /*
Please dont forget to change the FontName with your custom font name,you using in the script,that you placed in blogger html.
Now just important thing to implement is :- 1.To which place in your template you want to use custom font. 2.After it,just need to find the css property defining that part in your template. 3.After finding it,just define the font-family in its css like i have shown above.
And here i complete an easy installation with custom fonts from google api.
If you want to use multiple fonts or wanna style them with bold or italic.You can go furher here to read on how to do that.Just you have to make small changes in codes you get.As you will come to know after reading.
Installation Steps For Custom Fonts From Kernest API
2.Now you will see page like below.You will get an option to search for fonts.Either you can do by writting font and hit enter or by browsing them with tags like popular fonts or latest fonts or from any designers.
3.After selecting font you like, will see domain embed url.Just click it.
4.Pop up window will open like below and just type your blog url and hit add.
6.Now below the font you will see the codes to be placed in blogger i.e to left of domain embed url.Just copy those codes to your notepad.The codes look like below.
You just need to took the red codes and place them before the tag as you did for google api fonts.
7.Now again you need to define the font style css.Its all same way you have to do as i told above for Google API Fonts in step 7.
I hope now you would have no problem in installing custom fonts for blogger.If you still feel any problem, just leave your comment below i will see over it and will try to solve your problems.
How To Show The Post Date For All Your Blogger Posts you do on your blog including posts you have done On same day i.e as in blogger you have an option of date-header to show up the date for each post that you have done in blogger to show up when it was posted.But there is only one small problem in this feature,as when we do more than one post on same day the date shows up only for one post,that is last one not for both.So if you have problem with this and interested in displaying the date of post in all posts,you can solve this problem following this tutorial.Check the below image showing two posts of my demo blog which i have done on same day.
You will see as date is being shown for only one post.To solve this follow these Steps:-
1. Login to blogger 2. Click Layout 3. Click Edit HTML tab 4. Check the small box next to the text “Expand Widget Template" 5. Find this code :
6.Remove the code and replace with this one:
7. Click "SAVE TEMPLATE". 8. Done
Now it will show date for both posts as below.
Now, all of your posts in the same day will include the date. If you have any problem you can leave your comments.
You would be knowing for sure as now all the big bloggers with many writers use adsense revenue sharing hack for blogs.What actually it is about?.As many still would be not knowing about it,Like suppose i own a blog and run it.Now there are also,3 more authors to my blog who also write for my blog.Now the blog is owned by me but it have 4 authors including me who are very active on my blog to post and i have been using adsense adds at the beginning and end of the post to make some money out of it.
Now problem comes here,as how to distribute or share the revenue with other authors of my blog to give there share,as it becomes difficult to check how much the authors post is contributing to revenue of blog.So the thing only can be done is to show the adds of the that author google adsense account on posts done by him/her.As this will give him the exact revenue he deserves for doing that post.
I hope now you would be clear what i was talking about.Now this hack is very simple in wordpress blogs as plugin is available for it.Now i would like to tell you how make this work in bloggers.If you really have many authors to your blog-you can really use this hack to attract more authors and give them the reason to work hard for posting on your blog,which would give them the real revenue they deserve for that post.
As the best part is,if the author had previous posts on your blog,the adds will appear on that posts too automatically.Now how to implement it in blogger.
1. Login to Blogger dashboard 2. Navigate to Layout >> Edit HTML and Expand Widget templates 3. Search for the following code inside your template
4. Insert the following piece of code just above or below the red code you find.As adding above will show adds at beginning of post and below will result in at end of post.Or add at top and bottom both,to show at both places.
Insert Ad Code for admin here (first author)
Insert Ad Code for anshul here (second author)
Insert Ad Code for sunil here (third author)
5. Replace the author name and ad code with the actual ones.As names are in bold and replace whole line 'Insert Ad Code for admin here (first author)' with the add codes of that author.
Its not necessary to use only adsense codes there.The author can have any banner add also like of his affiliate program he wants.Its upon the author with what add he wants to display.
Like above i have made 3 authors- admin,anshul and sunil.You can make any number you like,just keep on adding codes as i have done.Just change them with the name of yours,you are using in blogger as display name i.e post author name.Remember all the author names should be different.
6. Save the changes you have made. 7. You are done. 8.Verify that correct ads are shown by viewing HTML source code of the web pages when visiting posts created by various authors or bloggers.
I hope it will be very helpful for some bloggers who have many authors to there blog and even give you now opportunity to invite other authors to your blog.
How To Show Blogger Profile Images In Blogger Comments.As many of us bloggers saying it as showing of avatars in blogger comments but they are not avatars, they are just your blogger profile images and many readers also get mistaken by it, But they are right to say them as avatars, as they are like avatars for our bloggers.As it has been near about an month blogger has released this feature and i have found most of the bloggers also using this in there blogs.But some still have problems and not have made the solution for blank spaces in comments for anonymous comments.So i would like to hold a complete detailed tutorial on it.The below picture show up how profile images show up in blog as i have taken this snapshot from my blog after implementing this hack.
Now How to enable the blogger profile images in blogger comments.
First of all Go to Blogger > Settings > Comments and enable “Show profile images on comment”
If you are using default blogger templates then they get enabled and profile images will start up to show in blogger comments.They can also start up to show up in some customized templates but it depends at to what extent there comment section been customized or not.
Some Of The Problems You Wouldn't Like even after Enabling Profile Images In Default Template.
There will be two major problems in it.
1)The bloggers who don't have uploaded there profile images to there profiles while comments will show up a blogger favicon of size 16x16 like below.It doesn't look good from my point of view because the blogger profile images show up a picture of size 35x35.
2) The bloggers who do comments with there blog urls or anonymous comments will end up with a blank space in comments.That looks really awkward.It destroys the beauty of comment system as you can see from below image.
I have shown all the 2 problems in above picture as i hope it will be clear to you right now.Now we need to solve these problems.But first i would like to tell you about how to enable profile images in comments in blogs who are using customized templates, just what they they need is to edit small bit of codes in there blogger html.Now carry on with this tutorial.
How Enable Blogger Profile images In Customized Templates
First of all enable the feature of profile images in your blogger settings as i showed above.Now check your comments.If it shows up blogger profile images in comments,then its ok else follow next step.
First step Go to Blogger Layout >Edit HTML and backup your template.Now Expand the widget templates and check if you can find this line there
If you don't find above line then find below line:-
And replace it with the above line which you didn't found in your codes.
And if you still not able to find the above line you may get this one:-
And replace it with the top most line which you didn't found initially.
Now find this line in code:-
And replace it with below codes.
If you are using the author comment highlighting trick then you can get this code once more in your template but not necessary.So replace it also with above codes.
Now Save your template and you will be now able to see blogger profile images in your comments as i showed above in picture but with the two problems of showing favicon of small size and blank space for anonymous and other url comments.
Solution For The Problem
What we need is now to resize the blogger favicon to the size of blogger profile images and we need one more image for showing up for anonymous and url comments.As Soufiane from LeBlogger was the first to come out with the solution and helping us.
Now Just Go to blogger edit/Html and find for ]]> tag and place the below css codes before it.
You can just edit the image link, height and width in above css codes as you like.
Save it, You're done.
Now The the above image will be shown up for anonymous and url comments and favicon will be resized to width and height of size as you set as above in css codes.Now check how the better comments look as compared to above i shown.
I am sure now you will have no problems in implementing this in your blogs.If still you have some problems leave your comments i will try to solve them.Best Of Luck !
As i have been seeing that some of the bloggers are not getting this line in there codes.So i wanna tell you one thing i.e the complete codes which enable profile images to be placed in the blogger.Just you have to place these codes in blogger, i think they might also can help you.
If you will put this codes in place of the code i told you find in beggining of tutorial that is the comment-block one the hack will also work, just you have to adjust the closing of div tags or dl or dt tags depends what have been defined in your template codes.
And if still you not able to do it and want to enable it,just invite me to your blog at my id anshulaffprg[at]gmail.com and i will do it in 5 minutes for you as i get admin to it.
How To Host Javascript Or .js files on Blogger, yes as blogger supports javascript which makes blogger support all the possible hacks in this platform, but the problem we bloggers face in using this is , where to host this javascript on blogger.As blogger doesn't provide any source to host javascript for blog like it has provided picasa for images.As of before we all were using googlepages to upload the .js files but google closed this service and switched to google sites.As still we can upload these .js files to google sites but just upload it with file extension .txt instead of .js and it start working.
But still,we can face any problem in future with it.The best solution is to have paid server to host your files for unlimited bandwidth, but bloggers using this free platform dont like spending on it.
I also provided you with the list of some servers to upload your javascript files but the problem was bandwidth which was very less.
So i will provide you the best solution to host your javascript on blogger itself and enjoy unlimited bandwidth.
Now just see the below codes.
Whenever you are trying to implement some hack making use of javascript you would have mostly been asked to download the .js file and upload to your own server,get its url and then replace it with red link in above codes shown above,and then place the whole above codes in blogger html before closing of head tag.The Problem we all face is getting an free server with unlimited bandwidth to host these javascripts.
So why don't we upload these javascripts to blogger itself.Just what you have to do is,whenever you are asked to do this kind of above stuff while implementing any hack.
Just use below code in place of above one i showed you.
Just in place of red line in above code what you have to do is just open the .js file (which you are asked to download or upload to your own server) in notepad or on your browser , copy its code and paste it in place of above red line.And your javascript codes are now ready which are now hosted on blogger itself instead of hosting to third party server.
Now you will face no bandwidth problems.If you still have any problem related to this tutorial just leave your comments.
How To Make Comment Bubble At Top Of Blogger Posts,as you have seen it using in many blogs and i am sure you would not be knowing how to make and show that comment bubble count and link at top of the blogger post.So that's why i am here to make you learn it,and add it to your blogs.As its not as difficult as you might be thinking of.
As you would have checked my last blogger template-The latest Blogger template for sure and must have liked it.I have made 3-4 more proffesional templates for you,but unluckily today i got my exams schedule and will not be able to post these templates for you till 30 of july,so you have to wait for them ,as they need little finishng touch and testing with an installation guide,so will post these templates in beggining of august.
In red above is the image link of bubble,you can use yours and don't forget to change its width and height also of the image you use.To adjust the bubble position you can edit the distance from margin-right and margin-top properties of css.
Some Readers had problem in aligning the comment number in comment bubble.To adjust it just edit padding values according to you in above css.I have added four 0 values to padding,First one is for padding-top,Second for padding-left,third for padding-bottom and last for padding-right.
Now after adding above css just find the below codes and add the red codes in between them as i have shown below.
Afer adding red codes in between them just preview your template,if comment bubble is ok,just save your template and you are done.Now you have added an comment bubble to bog in an very easy way you wouldn't have thought of.Enjoy this hack and let me know you liked it or not. And Friends i will try to schedule one or two posts for you,but that for sure will be small blogger tutorials which also will be very useful for you to learn a lot.
How to post, XML,HTML,Java Script and such kind of material as a plain text in Blogger. As many bloggers still don't know why they are not able to post the javacodes in there blogger posts.As i had posts on it before but now i am going to tell you about a simple mozilla addon.
This Script will adds a new button at the bottom of your new post area.It encodes the selected text so that it can be posted as plain text in Blogger.It will look like the Below image.
When you want to encode some code select it and cick on 'HTML ENCODE SELECTION' button.Below Image for reference
Your code will look like below image after being encoded.Now you can publish your post and see the result.
Hi friends you would have seen these tags option in many blog nowadays as presently you would be able to see it in my this blog also.These tags are nothing but just the labels of blogger which use to come at the begginig of the blogger posts or at the end of the post in blogger,just depends upon the blogger template you are using and where it is defined.Using these labels look like tags make blog look beautiful.
As when i started using this trick many readers of mine started mailing me to blog about this trick,so today i am just going to let you know how to make your labels look like tags.
First of all i would like to tell you that,this trick was first used by woork in his blog template design.You can check his blog also for this demo of tags.So i have taken this trick from his blog template.If you liked woork template design you can use the similar design like him from here.The other widget you must get on is image slider and Popular Post Widget.
You can change css properies like color and font yourself in above codes to adjust your blog.
Now search for below codes and add the red codes after it like i have shown below.
Tag
Now Preview your design if its ok then save your template. There's little css defined in above codes so you can change them also to your wants. I hope you will install it successfully because it doesn't seem as difficult you might have thought looking at it.Enjoy these tags.You can also try to search for reliable blog hosting companies with Web Hosting Search.
Hi friends,you would have seen for sure in blogger from a long time that,comments the readers do in some blog are numbered starting from count 1 to number of comments on that post page.As i think many bloggers dont like this hack because they don't find any use to it in there blogger but according to me its a great hack to make your blog look different from others and i have made this too simple and beautiful to implement it very easily.
And the second advantage is it makes very easy for readers to find any comment and differentiate between the comments and without numbering,it becomes difficult to find comment if there are lot comments on post,even sometimes i find this problem in wordpress blogs as even they dont use this hack but you should use it for sure.
Now this is how in picture below the numbering will look like while using my codes.As you can also see this live in my present template i am using in my blog.
And thanx to fernando from quiterandom to make it possible for us to make this numbering possible.
Now login to blogger GO To Layout > Edit/Html > Check Mark Expand Widgets > Press Ctrl+F and search for below codes in your template and add the red lines in between them like i have shown below.
And now i need some css part to make look the counter of comments to look beautiful so you just add these below css codes before the ]]> tag.
Now in above codes red link is the background to counter image you can change it with yours.And if you change image correct its width and height option in above css with the size of your image.
One problem you can face after making the css work can be the position of counter in comments.So just edit below lines in above css to make it align to proper postion in your blog if not working at perfect position for you.
margin-right: 15px; margin-top: -35px;
Now i hope you will love his hack for sure and will use it for sure.One more thing,i insist you to use this hack for sure if you are not using it and don't forget to implement highlight blog author comment for sure as this is what makes you different from your blog readers as i can't live without these hacks.
Peel add effect for blogger,its great way to attract you all blog visitors to something you really wanna show to your readers.Its the best place in the blog to advertise which would give maximum amount of ctr to an advertiser.You would have mostly seen these ads only in wordpress blogs and i first saw that add in johncow blog.Now we can use it in our blogspot blogs also,with the help of javascript as this hack works on jquery and css.
First i would like to thanx sohtanaka for making this jquery hack and then to naeemnur for making it to work in blogger.
As its the best place to advertise there is one more best place to advertise.That is stripe adds for blogger you can install it also,as it is also now available on blogger.And you should also read on for add placement rotator for blogspot blogs.
Now how to install peel add effect in blogger blog.
Just login to Blogger, Go To Layout > Edit Html > Press Ctrl + F
Now search for
And place the below codes above it.
In codes red line is the image url you wanna show in add,so make change according to your requirements.
Now search for tag and place the below code after it.
In above codes two lines in red are url,One to link to advertisement and one to the image which peel over the advertisement.I hope you will love this hack and will add one more place to to advertise,if you don't get any any advertiser,at least you can use your subscribe button there as i have set in codes.
How To Add Rss Feeds Image button in front of all your blogger labels,yes friend now you can add rss feeds button to your each label so that your readers can subscribe to your particular categories only they like the most instead of subscribing for your all blog posts.This is very useful for blogs who have mixed type content with several different categories in there blog.
With the help of this now we are able to add a subscribe button for each blogger label or category in front of it as this will be very useful for our readers.
As you can check for demo the labels with rss button link in my Blogger Templates blog.
Now let's see how to add this rss feed button to each blogger label.
Important-You must have installed your label widget in your sidebar before continuing this hack,otherwise you will not find below codes.
Login to Blogger Then Go To Layout > Edit Html > Expand Widgets.
Now search for below codes :-
And replace the above codes with below one :-
This is how in the below picture,your labels will look now with rss feed buttons.
As in the picture above the rss buttons are before the blogger labels but if you want to add rss feeds button after the labels like in below picture.
Use these codes:-
Now just what i have done is just addded small piece of red code in between the codes of labels.The code simply contains a image of rss feed which i have taken from feedburner site to have no problem in use for everybody and i have linked that image with the rss subscribe url for blogger labels.If you dont like image you can change it with yours.
With the use of this it becomes very easy for your reader to subscribe for only your favorite content instead for all posts.I dont know you need this or not but me wanted it for sure for my new blog which has all mixed content.
How To Show Adsense Adds In Between Of Blogger Posts,yup its right,you can now show adsense adds between the blogger posts.Just what you have to do is to select at which posrion of the middle of the post you want adsense adds to be shown up and adsense add will be shown up itself.No need to add the adsense codes manually in between the posts.
You can also add adsense codes at the start of blogger post and end of blogger post,for this trick you can continue to this post.
Now how to add adsense adds in between the blogger posts.First would like to show the working demo of it.
Got To Blogger Layout > Edit Html > Expand Widgets > Press Ctrl + F and seach For Below code
After getting this code replace it with below codes.
Please add your adsense add code in place of red line in above code.
And save your template.
Now whenever you write a new blogger post and when you reach in middle of the post where you want to show up adsense adds just add below code there
and continue writing the rest post.
Now when you will publish your post you will see adsense adds in between posts at the place where you placed the above line.
For any problem can visit here for original post. I hope you will love this for sure.
How Show Adsense Adds At Start And End Of Blogger Posts,yes friends you would have seen adsense adds at the start and end of the blogger posts in all of the todays blogger,as it gives more clicks to bloggers and help them in earning more revenue from adsense.So i will tell you on how to add adsense add in you blog to show up at beginning of post and one a the end of the post.
Just First Get the adsense Unit code from your adsense account and i recommend you to to make the adsense code template friendly from here.
Now got ot blogger Layout > Page elements > edit Html > Expand Widgets
Now find for below code
And now add the adsense code before and after above code as i added below:-
And Preview it if its ok.Then Save your template.And enjoy earning from adsense.
Note*-Adsense doesn't allow to place adds immediately after menu links or posts as sometimes it seems to readers as these adds are part of posts not advertisements.So there is chance to get accident clicks on adds and google dont want accident clicks,they want real clicks,so if after using this trick your ctr increasing to alarming rate you may get banned so i suggest not to use this trick if your ctr increases much.If you wanna place adds like this just place a text like advertisements always at the start of the add so as to distinguish between adds and posts,which is allowed by google.
Like this below example.
So you just need is to add the word advertisements also just above the adsense code you placed in your template.I hope you will do it very easily.Just the thing you have to follow not to get banned is just use word advertisements or sponsors at the above of adsense adds where ever you show up your adsense add to make your account safe.As google is very strict with its policies,they dont even give warning,they will immediately ban you and will only give you one chance to appeal them for your account i.e you will get only one hearing in there court and chances to get back your account is 1 percent.You can read this google adsense post to learn more about it.
I hope this information will be helpful to you.Best of luck !!!
How to Show Blogger Widget Only In Home Page Or Post Pages of blogger,as you have seen in wordpress blog its your wish to what widget and what add you want to show in sidebar of that page but this service cant be used in blogger as all sidebar bar widgets are linked to all pages in blogger including home page but now you can select the option which sidebar widget you want to show in blogger homepage and which one in all other blogger post pages.
As one more beautiful hack how to show only post titles in blogger home and label pages has also been released,dont forget to red about it.
Lets follow on this tutorial i.e how to show blogger widget only in home page or blogger posts pages.
Add the widget in blogger layout where you want to display in blogger.Now you wnt to select on which pages of blogger it should be displayed.
Now go to "Edit HTML" page. Mark "Expand Widget Templates"
And Search for
The number in red can be any like 1,2,3,4 it depends on your no of widget your are adding but the title to the widget you gave will be same.
So to make the widget code find easily for you find the below word
Add the red codes as shown above in codes whch you found for that particular widget in your blog html.
To display widget in all posts pages but not in HomePage
Automatic Read More Hack For Blogger With Thumbnails i.e expandable post hack for blogger with thumbnail of image used in blogger posts and all this work is done by the script automatically,you just dont need to locate your image the script will do all work for you automatically.Just you have to write your post and publish it with one image in post related to post.
Now how to install Automatic Read More Hack For Blogger With Thumbnails Demo snapshot is below.
Lets start with its installation:-
Now Login to Blogger Go to Layout > Edit HTML in your Blogger dashboard and check the "expand widget templates" box.
Find the closing tag in your blog template, and paste the following section of code immediately before it:
Note in above codes we can change the numeric numbers according to our need
summary_noimg = 430; is post cut height without image summary_img = 340; is post cut height with image img_thumb_height = 100; is thumbnail image height img_thumb_width = 120; is thumbnail image width
Now find this code in your template and replace it with below codes.
Preview Your template if its showing thumbnail with read more hack Save it.
To show thumbnail it should have one image in your blogger posts and please upload the .js file to your server and dont forget to change the link with yours in codes to make this hack work.




;">http://www.wallheaven.com/page_flip.png</span>)


